INSTALLATION
WALKTHROUGHS

Having trouble getting those emulators installed on your PSP?  Well, The Gameroom Blitz is here to help.  We'll guide you through the installation of a different game system or computer emulator each week.  Click here for general information about installing emulators on the Playstation portable, including links to the software you'll need to get started.

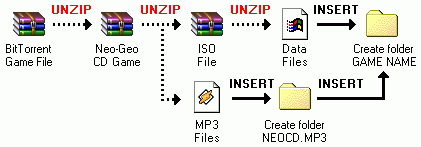
We're going out with a bang with the final installment of Complete Convergence.  This time, we're taking you through the installation of NeoCD PSP, without question the best emulator available for Sony's Herculean handheld.  This software plays some of the best arcade titles ever made, including classics like Samurai Shodown II, Metal Slug, and Twinkle Star Sprites.  Best of all, NeoCD PSP's high frame rate and wealth of options make the Neo-Geo experience just as exciting now as it was back in 1993.  Keep reading to discover how you can take that excitement with you wherever you go!


  NeoCD PSP  

WHY NeoCD PSP?

Put simply, it's an exceptional emulator that plays exceptional games.  The Neo-Geo CD was incredibly powerful for its time, playing arcade-quality software for a fraction of the price of its cartridge-based cousin.  The system's fatal flaw was that its single-speed CD drive left players twiddling their thumbs as often as they were resting them on their controllers.  Fortunately, NeoCD PSP addresses this issue by reading the game data directly from the memory stick... this results in lightning-fast access time on par with the Neo-Geo arcade hardware!  NeoCD PSP also runs flawlessly, without the frame rate issues and screen blurring common in other PSP emulators.

INSTALLATION

First, connect your PSP to your computer, then turn the system on and put it in USB mode.  Next, download the latest version of NeoCD PSP, NeoCDPSP v0.5u4, from this site.  Unzip the file you downloaded, then double-click the folder named "1.5" and press CTRL+A on your keyboard to select both folders.  Press CTRL+C to copy the folders, then double-click "My Computer" on your desktop.  Double-click the "GAME" folder, then press CTRL+V to paste the folders you copied into this directory.

Double-click these folders in the following sequence to
transfer the NeoCD PSP emulator to your PSP.

THE BARE NECESSITIES

You'll need to transfer a few files to your system before NeoCD PSP will run properly.  The first and most important of these files is called neocd.bin... this is the Neo-Geo CD BIOS, and it's required to run any of the system's games.  First, double-click the folder "NeoCD" on your PSP.  As always, don't click the file with the percentage sign on the end! 

Now, you will need to download a copy of neocd.bin.  You may have to do some searching to find it, but a good place to start is at the Makau's Domain web site.  Visit the Utilities page, then click the link "Neo Geo BIOS Pack".  Unzip the file after you've downloaded it, and you'll find a copy of neocd.bin.  Copy or drag it into the NeoCD folder.

You'll also need the files startup.bin, loading.bmp, and logo.bmp before you can get started.  Oddly, none of these files are included in the latest, unofficial build of NeoCD PSP.  Fortunately, you can download them from an early build of the emulator.  Click this link to begin the download, then unzip the emulator and put the files startup.bin, loading.bmp, and logo.bmp in the NeoCD folder.

If you're confused, just compare the picture below to your own NeoCD folder.  Make sure you have all the files shown below before you proceed.

You will need all of these files in the NeoCD folder
before you can start using NeoCD PSP.

RECOMMENDATIONS

The beauty of the Neo-Geo CD is that every one of the system's games is arcade quality.  Admittedly, they're not all great arcade games, but that's where they first made their debut!  Outstanding graphics and sound came standard with nearly every Neo-Geo release, but these ten games offered gameplay that was every bit as remarkable as those towering characters and thumping soundtracks.

The Gameroom Blitz has made its best effort to recommend games from a variety of genres.  There are many great titles on the Neo-Geo CD that are worth playing despite not being included in this list.  Many of them were left out simply due to the vast number of one-on-one fighters in the Neo-Geo software library.  You're encouraged to play as many games as you can find... chances are, you'll stumble across an excellent title that didn't make the list.

GAME

COMPANY

NOTES

FATAL FURY SPECIAL SNK The best Fatal Fury title available for the Neo-Geo CD
KING OF FIGHTERS '99 SNK The pinnacle of the KOF series, with cool characters and hot music
METAL SLUG SNK / NAZCO It's you and a friend against an entire army in this intense classic!
NINJA COMMANDO SNK / ADK A sleek, colorful military shooter from the creators of Time Soldiers
PULSTAR SNK / AICOM Even R-Type fans will be surprised by the difficulty of this title!
SAMURAI SHODOWN 2 SNK Better than the first game!  And the third, and the fourth, and the fifth...
TOP HUNTER SNK Gentle side-scrolling fun in the tradition of Super Mario Bros.
TWINKLE STAR SPRITES SNK / ADK Challenge your friends or the computer in this puzzle/shooter hybrid!
VIEWPOINT SAMMY This tough isometric shooter will really put you through the ringer!
WORLD HEROES 2 SNK / ADK Fun death matches make this more than just a Street Fighter clone

Of course, before you can play these great games, you'll have to find them.  In the unlikely event that you already have Neo-Geo CD games in your collection, you can transfer the data files on each disc to a folder on your computer, then convert the music files to MP3 format using a utility such as CDex

First, insert the disc into your computer.  Double-click "My Computer" on your desktop, then your CD drive (typically D: or E:... it will also be labelled with the name of the disc you inserted).  Press CTRL+A to highlight all the data files on the disc, then press CTRL+C to copy them.  Create a folder on your desktop, then double-click it and press CTRL+V to paste all the data files inside this folder.  You can give this folder any name you'd like, but for the sake of organization, it's best to name it after the game you're copying.

Next, run CDex or another MP3 extraction utility, then convert the music files on the disc to MP3 format (for CDex, just press F9).  Highlight the MP3 files you created, then press CTRL+X to grab them.  Now, double-click the folder you created, and create another folder inside it.  Call this folder neocd.mp3, then double-click it.  Finally, press CTRL+V to paste the music files into the folder.

This folder contains the data files needed to play the game Fatal Fury Special
on the PSP, while the folder NEOCD.MP3 holds all the necessary music files.

If you don't have any Neo-Geo CD games, you can obtain them with a file-sharing client, such as BitTornado.  Download and install the software, then visit the site TorrentSpy and enter the term "Neo Geo" in the search window on the top of the page.  Click the "Go" button, and a list of results will appear.  Look for a result labelled "Neo Geo CD", then click it.  Finally, click the grey "Download Torrent" button to begin the download.  Be patient and let it finish... you may need to leave your computer on overnight to get the entire file.

Once the download is complete, double-click the white square on the bottom right-hand corner of the screen, then click the Finish button.  Unzip the file using a compression utility like WinRAR.  You'll find a large number of games inside the file.  Now, unzip the game of your choice.  You'll find both MP3 (music) and ISO (data) files inside it. 

Create a folder on your desktop called neocd.mp3, and copy the MP3 files into it.  Next, create a folder on the desktop named after the game you wish to play.  Unzip the ISO file, then put its contents into the folder you just created, along with the neocd.mp3 folder.

This is a lot to absorb, so carefully examine the diagram shown below before you proceed.

Follow the steps shown here to extract the music and
data files from the games you downloaded.

GETTING STARTED

Connect the PSP to your computer, then put it in USB mode to begin transferring the game.  Click the folder you created earlier, then press CTRL+C to copy it.  Double-click "My Computer" on your desktop.  Next, double-click "Removable Disk," then "PSP," then "GAME," then finally "NEOCD."  Press CTRL+V to transfer the game to your PSP.  Wait for a few minutes, then disconnect the PSP from your computer using the steps described at the bottom of this page.

Double-click these folders in the following sequence to
transfer Neo-Geo CD games to your PSP.

Press the O button on your PSP, then press right until the "Game" icon is highlighted.  Press down until the "Memory Stick" icon is highlighted, then press the X button.  Highlight the icon "NeoCDPSP v0.5u4," then press the X button.  The emulator will begin.  After a brief note from the designer, you'll see a screen like this one:

ms0:/PSP/GAME/NeoCD/                                                                         222Mhz
                                                                                                                  100%

     ..
    
Fatal Fury Special/


O  OK      Parent dir.                      ^, v, <, > to browse list

Highlight the game you wish to play, then press the O button.  You'll see a note that reads, "Found NEOCD Directory.  O to launch, X to browse."  Press the O button.  After a brief wait, the game you selected will begin!

GOLDEN GRAIL: TWINKLE STAR SPRITES

When you need a break from the dozens of fighting games on the Neo-Geo CD, this is just the ticket.  Twinkle Star Sprites is a vertically scrolling shooter from Alpha Denshi, the creators of the World Heroes series.  It also serves as a counterbalance to those games, being stuffed with all the creativity that ADK's shameless clones of Street Fighter II were missing.  You'll clash with nearly a dozen opponents in this inspired shoot 'em up, blasting chains of fluffy enemies that become considerably more threatening when they're sent over to your rival's side of the screen.  Last long enough, and play well enough, and you may even deliver an especially nasty surprise to your opponent... an enormous, bullet-spitting boss!

There's no special setup required for Twinkle Star Sprites, and it's not difficult to find... any BitTorrent file with Neo-Geo CD games is sure to include it.  Just follow the instructions above to install the game on your PSP, and enjoy!

ADVANCED USAGE

After years of wishful thinking, at long last the power of the Neo-Geo is in the palm of your hand!  Can it get any better than this?  Actually, yes!  A few tweaks in the option menu is all it takes to make your favorite arcade titles from the 1990's even better on the PSP.

While playing any game, press the L trigger on your PSP.  An option screen similar to this one will appear.

[NEOCDPSP 0.5]  -  Menu
                                                                                                                  100%
     Sound : On
     Music : On
     Render : 1:1
     Frameskip : 0
     -------------------
     Key Config
     Autofire A : Off
     Autofire B : Off
     Autofire C : Off
     Autofire D : Off
     -------------------
     GFX Engine : Hardware
     Video Sync : Off
     Show FPS : Off
     60fps limit : On
     -------------------
     PSP clock : 333...

O  OK      Parent dir.                      ^, v, <, > to browse list

A dark grey bar will appear on the top of the screen, highlighting the first option.  Press down on the D-pad until this bar is resting over the option PSP Clock.  Now, press right until the number next to this option reads 333.  This is the PSP's fastest clock speed, turned off by default in most official games to conserve battery life.  However, it's worth the extra power consumption in this case, as it'll make your Neo-Geo CD games run much more smoothly.  Furthermore, the clock speed will return to its normal setting while you're running official PSP titles.

Next, press down on the D-pad until the option NEOGEO Region is selected.  When the emulator is first installed, this option is set to Japanese.  Now, this is just fine and dandy if you're playing a violent military shooter like Metal Slug, which was censored when it was released in the United States.  However, if you want to catch all the wacky dialogue in one-on-one fighting games like Fatal Fury Special and King of Fighters '99, you'll need to change the region setting.  Press right on the D-pad until the region is set to USA or Europe.

Finally, you can change the button settings to your liking, which really comes in handy for the many fighting games available for the Neo-Geo CD.  Highlight the option Key Config, then press the O button.  A list of buttons will appear.  Highlight the A button, then press the button of your choice to assign it to A.  Move down the list until you've assigned a button for D, then highlight Return to Menu and press the O button.  Note that you can also assign rapid fire and button combinations to a single button on the PSP.

There's one other way to maximize your enjoyment of NeoCD PSP, while minimizing the space used on your memory stick.  If you're pinched for storage space, but you really, really want to squeeze your favorite Neo-Geo game onto your PSP, you have options.  The first, and easiest, is just to erase the neocd.mp3 folder.  You'll lose the background music, but the game itself will play just fine, and it will be a whole lot smaller.  The second method is to take the data files from your game and compress them into a ZIP file.  NeoCD PSP can still read them, and you'll save yourself a little space on your memory stick.  This comes with a nasty side effect, however... the painfully long load times that were a trademark of the Neo-Geo CD will come back to haunt you if the game is larger than ten megabytes!

This marks the conclusion of Complete Convergence.  I hope you've had fun with this series, and that you're still having fun with the emulators you've installed!

fin (I mean it this time!)

This installment is essential for PSP owners with freshly released games like Madden '06 and Burnout Legends.  These games will try to force you to update your firmware... and that firmware will prevent you from playing your favorite oldies on the go.  Fortunately, there's no need to neuter your PSP to enjoy the latest official releases.  Just follow these instructions and you too can have the best of both worlds!


  DON'T TOUCH THAT FIRMWARE!!!  

So you're excited about the latest games for the PSP.  Namco Museum Battle Collection and Burnout Legends are both terrific, and there are plenty of other exciting titles on the way for Sony's handheld.  However, all of these new games come with a price, and I'm not talking about the fifty dollars you'll shell out for each one.  No, there's also the matter of the dreaded firmware update.  An update to 1.52 is included with every new PSP release, and you'll have to install it before any of these excellent games can run.  So, what's it gonna be?  Awesome third party software, or the thousands of games that PSP emulation has to offer?

Luckily, you don't have to make this hard choice.  A new program for the PSP called the WAB Changer lets you have it all.  It's easy to install and use... just follow these instructions.

First, you'll need to download the WAB Changer.  Visit the following site:

THE OFFICIAL WAB CHANGER WEB SITE

Next, click the "Download" icon at the top of the page, then scroll to the bottom of the page.  Find the entry "WAB Version Changer V2", then click the tiny blue disc icon to its right.  Select a folder for the file and click OK. 

After the file is downloaded, you'll need to unzip it.  There's just one problem, though... it's in an unusual compression format that hasn't yet been adopted by Microsoft.  You'll need to download and install a compression tool that can handle RAR files... The Gameroom Blitz personally recommends either WinRAR or 7-Zip.  Install either of these programs, then follow the instructions included with them to unzip the WAB Version Changer.

Normally, to install homebrew software on your PSP, you would need to use an Exploit tool like SeiPSPTool.  That won't be necessary this time... the files ready to be dropped on your PSP the moment they're unzipped!  Connect your PSP to 
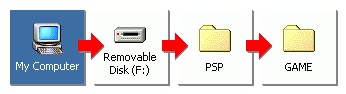
your computer, then click "My Computer" on your desktop.  Next, click the icon "Removable Disc", then PSP, then GAME.  If you've installed any of the emulators on this page, you know the drill!

Click the folders in this sequence to reach the GAME folder on the PSP.

Now, copy the files WABVersionChangerV2 and WABVersionChangerV2% on your computer, and paste them into the GAME folder on your PSP.  Finally, disconnect the PSP from your computer using the instructions on the bottom of this page. 

Press the O button on your PSP to take it out of USB mode.  Next, press right until you reach the game menu, and press down until you reach the icon marked Memory Stick.  Press X, then press down until you find the icon labeled "WAB Version Changer V 2.0."  Press the X button to start the program.  You'll see a menu similar to this one:

------------------------------------------------

WAB VERSION CHANGER For PSP 1.00 & 1.50
By Yoshihiro V2
------------------------------------------------

Please Connect Your Charger

Press START  for Quit now
Press [] For Patched Your PSP System in 1.00
Press X For Patched Your PSP System in 1.52
Press O For Patched Your PSP System in 1.50
Press Triangle For Patched Your PSP System in 2.00

------------------------------------------------

You'll need to connect your PSP to an AC adapter before the program will run properly.  Plug the PSP into its AC adapter, and the AC adapter into a wall outlet. 

Now, it's time for the WAB Changer to work its magic on your PSP!  Pressing any of the face buttons will change the firmware's version number, but not the firmware itself.  This allows you to play any PSP game, even the most recent ones, without sacrificing the ability to run emulators and other homebrews.  Press the triangle button on your PSP, and leave the system alone for about ten seconds.  Don't disturb it or turn it off!

When the WAB Changer is finished, your PSP will be convinced that it's running the latest firmware.  You won't have the web browser or any of the other features offered in that firmware update, but what you WILL have is the ability to run homebrew software along with outstanding games like Burnout Legends.  The best part is that the WAB Changer only needs to be run once.  You won't need to switch between firmware versions to run emulators and new games... from this point on, your PSP can handle them all!

In this edition of Complete Convergence, we take PCE for PSP out for a spin.  There's no doubt about it... this is one of the best emulators you can find on the PSP.  However, you'll need a good set of instructions to tap its full potential, and the tersely written Japanese manual included with the emulator just isn't going to cut it.  Read on to learn how to play both HuCards and TurboDuo CDs on the world's most powerful handheld game system!


  PCE for PSP  

WHY PCE for PSP?

The Turbografx-16 was as fondly remembered by most Americans as a migraine headache, but it was far more popular in Japan, where it was known as the PC Engine.  Hundreds of great games were released for the system in the Far East, on both cards and compact discs.  Many of these games were fast-paced, arcade-quality titles with colorful graphics and a strong Japanese flavor.  Shooters in particular were especially well represented on the PC Engine.  PCE for PSP lets you take nearly perfect conversions of arcade favorites like R-Type, Raiden, and Xevious with you wherever you go.  Finally, PCE for PSP just runs better than other 16-bit emulators on the PSP.  When set to its maximum clock speed of 333MHz, the PSP can run nearly every PC Engine game at full speed, with no frame skipping!

INSTALLATION

PCE for PSP is a cinch to install... at least, at first.  You won't need any BIOS files to run standard Turbografx-16 games.  Just download the emulator from this site, unzip it, then install it on your PSP using the instructions at the bottom of this page.  When Sei PSP Tool asks you for a name for the emulator, type in "TurboDuo".

THE BARE NECESSITIES

Standard Turbografx-16 games will run fine without any BIOS files.  However, games released on CD-ROM will not.  You should only need one BIOS file to run every Turbografx-16 CD and Super CD.  The file is listed below in red.  However, it's fun to run Super CD games on an earlier version of the BIOS.  You won't be able to play the games this way, but you may find some surprising hidden content!

Super CD-ROM2 System V3.00 (J).pce

CD-ROM System V2.00 (U).pce

Both files can be found on the Planet Emulation web site.  Be sure to download them... you'll need them later.

RECOMMENDATIONS

Once you've got the emulator on your system, it's time to find some games.  Planet Emulation is a great source for HuCards, the credit-card sized games released for the core Turbografx-16 system.  Visit the site, then click the "PC Engine" link on the right hand side of the screen.  Scroll down until you find the link named "GoodPCE", then click it.  You'll find an extensive list of games, sorted alphabetically.  Download all the games you'd like to put on your PSP, then unzip them.

If you're having trouble deciding which games to download, here are a few suggestions.  All of these titles are recommended by The Gameroom Blitz, and can all be obtained from Planet Emulation:

GAME

COMPANY

NOTES

15 IN 1 MEGA COLLECT'N IMAGE The closest thing the PSP has to a VIC-20 emulator
1943 KAI NEC/NAXAT Capcom's spectacular WW2 shooter, ported with style to the TG-16
BOMBERMAN '94 HUDSON One of the best games in the long-running Bomberman series
DEVIL CRASH NEC/NAXAT Japanese version of the exceptional medievel pinball simulation
GALAGA '90 NAMCO The slick 16-bit sequel to Namco's classic shooter Galaga
KLAX TENGEN A most excellent translation of this visually distinctive puzzle game
NEUTOPIA NEC/HUDSON Zelda fans will appreciate this comfortably familiar adventure title
NINJA SPIRIT IREM Fast-paced action in the tradition of Ninja Gaiden.  Very stylish!
RABIO LEPUS SPECIAL VIDEO SYSTEM A lighthearted, yet brutally challenging, side-scrolling shooter
ZIPANG PACK-IN, TECMO An Eastern-themed variation of the action/puzzle game Solomon's Key

When you've downloaded all the games you want to play on your PSP, double-click the My Computer icon, then the folders shown below to open the TurboDuo folder on your PSP.  Take the game ROMs and the two BIOS files you downloaded from Planet Emulation, and drag them to this folder.

Double-click these folders in the following sequence to
begin transferring your games to your PSP.

GETTING STARTED

Disconnect your PSP from your computer, following the steps on the bottom of this page.  Now, press O on the PSP to take it out of USB mode, and press right on the D-pad to scroll over to the Game icon.  Press down to highlight the Memory Stick icon, and press X.  Highlight the icon "PCE for PSP" and press the X button.  After the PSP logo appears, the emulator will begin!

When the emulator starts, you should see a screen similar to this one:

ms0:/PSP/GAME/TURBODUO/                             PCE for PSP 0.7 ####### >w<

     ..
     SAVE
     15 In 1 Mega-Collection (Japan).pce
     1943 Kai (Japan).pce
     Bomberman '94 (Japan).pce
     Devil Crash (Japan).pce
     Galaga '90 (US).pce
     Klax (US).pce
     Neutopia (US).pce
     Ninja Spirit (US).pce
     Rabio Lepus Special (Japan).pce
     Zipang (Japan).pce


O: ##  X: #####  A: #######

The currently selected game or option is highlighted in red.  Press the D-pad either up or down to select the game you wish to play, then press O.  Remember, don't press X!  This exits the emulator and returns you to the PSP BIOS screen.

The game you've selected should begin.  When you're finished playing, press the L button to quit.  You'll see a screen similar to this one:

                                                                           PCE for PSP 0.7 ####### >w<

(^w^)  BaseClock                    7160000
          AutoFrameSkip                        1
          Debug                                    0
          sound                  ON
          pcm                     ON
          video mode          normal

          key config

          WallPaper menu     9
          WallPaper game     9

          PSP Clock             222Mhz

          auto save load       OFF
          state load              .SAV
          state save

          card change
          cd change

          continue

          exit

To select another game, move the red cursor down to card change, and press the O button.  To quit the emulator and return to the PSP's BIOS screen, move the red cursor down to exit, and press the O button twice.

THE ART OF RUNNING TURBODUO GAMES

Along with HuCards, the Turbografx-16 is capable of playing compact discs.  A standard Turbografx-16 needs a CD-ROM peripheral to play these games, but the TurboDuo, an enhanced version of the system released years later, already has a compact disc drive built into it. 

The PSP doesn't have a standard CD-ROM drive, and you can't even buy one for it.  How, then, could it possibly play TurboDuo games?  The designer of PCE for PSP has found a clever solution, but it takes a little work to take advantage of it.  Here's what you'll need to do to get started.

First, you'll need to find a source of TurboDuo games.  If you happen to already own some, you can use CD burning software like Alcohol 120% to extract the data and music from the discs (consult your software's instruction booklet for more information on this).  However, if you don't, you can find the games online using newsgroups, IRC chat rooms, or peer to peer software. 

A file sharing client called BitTorrent is especially handy for this purpose... you'll find it on the BitTornado web site.  After downloading and installing BitTornado, you can find TurboDuo games on a site called TorrentSpy.  Type the key words "Turbo CD" in the search window on the top of the page, then press Enter.  If any files with TurboDuo games are available, they'll appear onscreen. 

Click one of the files, then the grey "Download Torrent" button at the top of the screen to begin downloading it.  This will take a while- a LONG while!- so be patient, and leave your computer running until it's finished.  When the download is complete, the BT logo on the bottom right hand corner of your screen will turn a bright white.

The file you downloaded should contain dozens of ZIP files, each with a different TurboDuo game inside it.  Select a game that interests you, and unzip its contents into an appropriately named folder.  You'll find an assortment of ISO files, MP3 files, and text documents, similar to this:

The contents of Bonk III: Bonk's Big Adventure for the TurboDuo.

You won't need the text files, so feel free to delete them.  However, you will need the ISO and MP3 files, along with one additional file not included in the package.  This is called a table of contents file.  Like the table of contents in a book, the TOC file organizes the game files, allowing the PSP to access them quickly.

You can find TOC files on the SNK/NEC TOC Database.  Visit the site, then click one of the "PCE" links on the left hand side of the page.  The link you select depends on the country where the game was made, and the type of CD it is. 

Pay close attention... this is important!  The first CDs for the Turbografx-16 played on any Turbografx system with a CD-ROM player, but later games required memory expansion... these are called Super CDs or Arcade CDs.  Both standard CDs and Super CDs can be used on the PSP, but not Arcade CDs.

If the game is a...

...and it was made in...

...the link you want is...

Standard Turbografx-16 CD

The United States

PCE CD USA

Standard Turbografx-16 CD

Japan

PCE CD JPN

Turbografx-16 Super CD

The United States

PCE SCD USA

Turbografx-16 Super CD

Japan

PCE SCD JPN

Click the link that best describes the game you want to play, then scroll down through the list until you find it.  Click the name of your game.  You'll find track listings directly under the screen shots of the game.  This is the TOC file.  Highlight all the text from the beginning of TRACK 1 to the end of the last track listed, then hold CONTROL and press C to copy it.

Now, click the Start button on the bottom of your desktop.  Click Programs, then Accessories, then Notepad.  Hold CONTROL and press V to drop the table of contents into Notepad.  Click File on the top of the window, then Save As.  Click the arrow next to the "Save As Type" text window, then select "All Files".  Click inside the text window marked "File Name", then name the file whatever you wish, followed by the text ".toc".  For instance, Bonk III: Bonk's Big Adventure could be called "bonk3.toc".  Press Enter and the file will be saved.

Your table of contents file should look something like this.

Next, you'll need to rename all the ISO and MP3 files in the folder.  Right click each file, then select "Rename" from the list that appears.  Delete the word "Track " from each file name, but leave the number alone.  When you're finished, the files should be named "01.MP3", "02.ISO", "03.MP3", and so on.

Reconnect your PSP to your computer and put the system in USB mode, using the instructions on the bottom of this page.  Now, highlight the folder containing the game files, then hold CONTROL and press C.  Double-click My Computer on your desktop.  Next, double click the Removable Disk icon, then PSP, then Games, then TurboDuo.  Hold CONTROL and press V to transfer the game to your PSP.

When the game has been transferred, disconnect the PSP from your computer, then run PCE for PSP using the steps described earlier in this page.  Highlight Super CD-ROM2 System V3.00 (J).pce, then press the O button.  You will receive an error message, but don't sweat it... this can be easily remedied.  Press the L trigger on your PSP to bring up the option menu.

                                                                           PCE for PSP 0.7 ####### >w<

          BaseClock                    7160000
          AutoFrameSkip                        1
          Debug                                    0
          sound                  ON
          pcm                     ON
          video mode          normal

          key config

          WallPaper menu     9
          WallPaper game     9

          PSP Clock             222Mhz

          auto save load       OFF
          state load              .SAV
          state save

          card change
(^w^)  cd change

          continue

          exit

Move the red cursor down to cd change, then press the O button.  A list of games will appear... the one you want to play will be shown in yellow.  Highlight that game, then press the O button.  The table of contents file you created should appear.  Highlight it, then press the O button.  You should see a screen similar to this one:

Press the start button on your PSP.  At long last, the game will begin!

GOLDEN GRAIL: DRACULA X: RONDO OF BLOOD

Some say that Dracula X: Rondo of Blood is the best Castlevania game ever made.  While this is debatable, it's probably safe to say that Rondo of Blood is the best Castlevania game you've never played.  Rondo of Blood was released exclusively in Japan, for a system that had sold poorly in the United States.  Only a few Americans had the extreme fortune to play the game, and their glowing reviews made Rondo of Blood an almost mythical treasure among Western gamers.  If ever there was a video game that could be considered a holy grail, with both respect to its rarity and overall quality, this would be it.

Fortunately, emulation has given gamers across the globe the chance to experience this lost chapter of the Castlevania series.  PCE for PSP makes it more convenient than ever to play Rondo of Blood, marking the first time that the game has been available for a handheld game system.

If you were able to use the instructions in the previous chapter to run TurboDuo games on your PSP, you'll have no trouble at all with Dracula X: Rondo of Blood.  However, a condensed list of the steps you'll need to follow are provided below.

1.  Download a copy of Dracula X: Rondo of Blood, using BitTorrent or another file sharing client.
2.  Unzip the contents of the Dracula X ZIP file into a folder, and name the folder DracX.
3.  Visit the SNK/NEC TOC Database web site, then click "PCE SCD JPN", then "Akumajou Dracula X: Chi No Rondo."
4.  Highlight the text on the page, starting with "TRACK 1" and ending with "LBA=211262", and press CTRL+C to copy it.
5.  Open Notebook (Start -> Programs -> Accessories -> Notebook) and press CTRL+V to paste the text into it.
6.  Click File, then Save.  Select "All Files" in the Save As Type window.
7.  Type "DracX.toc" in the File Name window, and click the OK button (be sure to save the file in the DracX folder!).
8.  Rename all ISO and MP3 files so that they are labelled by number (ie "01.MP3", "02.ISO", "03.MP3", etc).
9.  Connect your PSP to your computer and put the game system in USB mode.
10.  Transfer the DracX folder to your PSP, inside the TurboDuo folder.  Don't insert it in the TurboDuo% folder!
11.  Disconnect the PSP from your computer and start PCE for PSP 0.7.
12.  Select Super CD-ROM2 System V3.00 (J).pce in the list of games, then press the L trigger and select cd change.
13.  Select the yellow DracX folder, then DracX.toc.  Press the start button to begin the whip smackin' goodness!

ADVANCED USAGE

You've learned enough about PCE for PSP to have hours of fun with it, but there are a few tricks you can use to push this already great emulator to its limits.  Start a game as you normally would, then press the L trigger on the PSP to bring up the options screen.  Now, move the cursor down to PSP Clock, and press right on the D-pad until the number reads 333Mhz.  Your PSP is now set to its maximum speed!  This results in faster, smoother emulation of your favorite Turbografx-16 games.

                                                                           PCE for PSP 0.7 ####### >w<

          BaseClock                    7160000
          AutoFrameSkip                        1
          Debug                                    0
          sound                  ON
          pcm                     ON
          video mode          normal

          key config

          WallPaper menu     9
          WallPaper game     9

(^w^)  PSP Clock             333Mhz

          auto save load       OFF
          state load              .SAV
          state save

          card change
          cd change

          continue

          exit

Note the other available options in this menu.  PCE for PSP allows you to change the key configurations, save your progress in games, and stretch the display to take full advantage of the PSP's massive screen.  You can even use wallpapers to add a personal touch to the emulator... just make a BMP file with the PSP's screen dimensions (480x272), and save it in the TurboDuo folder on your PSP. 

While playing a game, press the L trigger on your system, then move the red cursor down to either WallPaper menu or WallPaper game.  Press the O button, then select the BMP file from the list that appears.  Press O again to return to the option menu, then press the D-pad left and right to adjust the brightness of the wallpaper.  If you selected WallPaper menu, the picture you've selected will appear behind the option menu and game select screens.  If you selected WallPaper game, the picture will appear as a border around the game you're currently playing.

That's all you'll need to know to relive those childhood memories!  Oh... you didn't have a Turbografx-16 when you were a kid?  In that case, I guess you'll be reliving some Japanese guy's childhood memories.  Either way, you'll have fun!

fin

In this edition, we examine the emulator fMSX.  Why do you want it?  How do you use it?  What games does it play, and where can you find them?  We answer all these questions and more in this comprehensive guide.  As a bonus, we've included detailed information on how to run Metal Gear 2: Solid Snake, the golden grail of the MSX software library.


  fMSX  

WHY fMSX?

If you're a gaming historian, or just a long-time fan of the hobby, fMSX is a must for your PSP.  Many of the most enduring video game series had their start on the Japanese MSX computer, including Bomberman, Aleste/Zanac, Buster Bros., and most notably, Metal Gear.  In addition to these titles, the MSX is also home to Activision classics like Pitfall! and H.E.R.O., which as of this writing can't be played with any other PSP emulator.

INSTALLATION

fMSX can be installed in the same way as any other PSP emulator.  Download fMSX from this site, unzip it, then follow the instructions at the bottom of this page.  Use the name MSX for the folder where the emulator will be stored on your system.

Once the emulator is transferred to your PSP, go to My Computer on your desktop and double-click it.  From there, click the removable drive icon, then the PSP folder, then the Game folder, then finally the folder named MSX.  This folder may also be named "MSX            1", with twelve spaces and a 1 on the end.  DO NOT open the folder with a percentage sign on the end!

Double-click these folders in the following sequence to
begin setting up the fMSX emulator.

THE BARE NECESSITIES

The file "KEYBOARD.BMP" is included with the fMSX emulator.  Take this file and copy it to the MSX folder on your PSP.  You will need this file when running games that require keyboard input.

Before fMSX will run, you will need to download special BIOS files and transfer them to your PSP.  These files were originally built into the MSX computer and are necessary for the system to function.  Here's what you'll need to continue:

DISK.ROM

FMPAC.ROM

MSX.ROM

MSX2.ROM

MSX2EXT.ROM

MSX2P.ROM


MSX2PEXT.ROM


It is important to note that all of these files are copyrighted by ASCII Corporation, the manufacturer of the MSX computer, and that it is only legal to use them if you own an MSX system.  If you have this computer, you may obtain these files from a web site devoted to emulation, such as Planet Emulation or Slor's MESS BIOS Images

Go to Slor's MESS BIOS Images, then scroll halfway down the page.  Download the files MSX.ZIP, MSX2.ZIP, and MSX2P.ZIP, and unzip these files to your desktop.  Next, return to the MSX folder on your PSP... this folder should still be open, so all you'll need to do is click on it.  Right-click inside the folder and select New, then Folder.  Type the name BIOS and press enter.  Finally, highlight the files you unzipped and drop them into the folder you've created.  The emulator is ready to run!

Create a BIOS folder inside the MSX folder, then drop all your BIOS files in it.

RECOMMENDATIONS

The Gameroom Blitz personally recommends the following MSX titles.  They're all compatible with the fMSX emulator, and they're among the best games you'll find on the system.

GAME

COMPANY

SETUP

NOTES

ALCAZAR ACTIVISION MSX1, Mode 0 Early overhead adventure title, reminescent of Zelda
ALESTE 2 COMPILE MSX2, Discs Disc swapping necessary to run; see below
GUARDIC COMPILE MSX1, Mode 0 Precursor to Guardian Legend on the NES
H.E.R.O. ACTIVISION MSX1, Mode 0 Underrated 2600 classic, reborn on the MSX
METAL GEAR 2 KONAMI MSX2, Mode 2 See below for download/installation details
PENGUIN ADVENTURE KONAMI MSX1, Mode 0 Exceptional racing/action game with a 3D viewpoint
Q*BERT KONAMI MSX1, Mode 0 A Japanese spin on the kooky arcade game
XEVIOUS: FARDRAUT NAMCO MSX2, Mode 5 Fardraut Saga, an MSX-exclusive sequel to Xevious
ZANAC EX COMPILE MSX2, Mode 5 Thrilling overhead shooter with sweet graphics
ZENJI ACTIVISION MSX1, Mode 0 Highly original puzzle game with an Eastern flavor

All of these titles can be found on the Planet Emulation web site.  Visit the site, click the MSX 1/2 logo on the right hand side of the screen (it's listed under "Ordis"), then click one of the ROM links at the bottom of the page.  MSX2 games are naturally more advanced than MSX games, but standard MSX games are much smaller, making them ideal for anyone without much space left on their memory sticks.

Download all the games you want to play, then copy them to the MSX folder on your PSP.  You won't have to unzip any cartridge games, but disc images must be unzipped before they can be recognized by fMSX.  Once you're finished, disconnect the PSP from your computer using the steps described at the bottom of the page. 

Now, press O on the PSP to take it out of USB mode, then press right until you reach the icon marked "Game".  Press down until the Memory Stick icon is highlighted, then press X again.  The fMSX icon should appear.  Highlight it and press X to start the emulator.

GETTING STARTED

When the emulator begins, you should see a screen similar to this:

(^w^)  CONFIG

          MSX TYPE      MSX1

          ROM 1               0 Generic 8kB
          ROM 2               0 Generic 8kB

          DRIVE A
          DRIVE B

          continue

          POWER

          state quick load
          state quick save
          state file load
          state file save

          EXIT

This is fMSX's menu screen.  You'll use this to load and run games, save your progress, and change your control settings, among other things.  You'll learn more about it later, but for now, try testing the emulator with a simple game, like the MSX version of Q*Bert. 

Move the red cursor (it looks like a deliriously happy cat) to ROM 1 and press O.  A list will appear, featuring all the games you can play with fMSX.  Find Q*Bert in this list and highlight it.  Press the O button again. 

You will return to the menu screen.  Notice that Q*Bert is written in yellow next to ROM 1.  The game has been loaded into the first cartridge slot on your virtual MSX, and is ready to run.  Move the cursor down to POWER, and press the O button.  After a brief wait, Q*Bert will begin.

This ain't your daddy's Q*Bert!  Actually, it's more like your
recently discovered Japanese cousin's Q*Bert.

That's all there is to it!  If you just wanted to run early MSX games like this one, you could stop reading this guide right now.  However, you'll probably want to try the later, more advanced games for the MSX, and those require a little more work.

THE ART OF RUNNING MSX2 GAMES

To get the most out of fMSX, you'll need to learn how to run software for the more powerful MSX2.  This is an enhanced version of the Japanese computer, capable of playing nearly 16-bit quality games.  Oh yeah, now that's the good stuff!

Before you begin, you'll need to set up the MSX keyboard.  First, press the L trigger on the PSP to quit Q*Bert.  Once you're done, move the red cursor up to the word CONFIG and press O.  You'll see a screen like this:

(^w^)  MAIN MENU

          VIDEO MODE      272x228 normal

          KANA                 50 ###

          KEY CONFIG

          WallPaper menu           20
          WallPaper game           20
          WallPaper keyboard     20

          DISK AUTO SAVE                       OFF
          STATE AUTO SAVE&LOAD          OFF
          CMOS AUTO SAVE                      OFF
          SRAM AUTO SAVE&LOAD            OFF

          CpuClock game                    222
          CpuClock menu                    222

          continue

Move the cursor down to WallPaper keyboard and press O.  Now, highlight the file named KEYBOARD.BMP and press the O button.  The keyboard will appear on the right hand side of the screen.  Now, whenever you're playing a game, you can bring up the keyboard by pressing the R trigger on your PSP.

Typing is easy... just press the D-pad in any direction to move the red arrow on the keyboard, then press the O button to press the highlighted key.  When you're finished, press the R trigger again... the keyboard will vanish, and the D-pad can once again be used to control your onscreen character.

Now that you've got the keyboard programmed, you're probably itching to play some of those advanced MSX2 games I'd mentioned earlier.  Move the red cursor down to the word continue, then press the O button to return to the main menu screen.

Let's say you wanted to play the MSX sequel to Xevious, Fardraut Saga.  You're going to have to change a few options before it'll start.  First, move the red cursor down to MSX TYPE, and press right on the D-pad.  The MSX type will change from MSX1 to MSX2. 

Now, move down to ROM 1 and press right, until the words "5 ASCII 16Kb" appear.  This is the cartridge format that Xevious: Fardraut Saga uses... each MSX2 cartridge has its own cartridge format, and you'll need to specify it before the game will run properly.

Press O, then highlight Xevious: Fardraut Saga from the list that appears.  Press O again to select the game and return to the main menu.  Finally, move the red cursor down to POWER and press the O button.

          CONFIG

          MSX TYPE      MSX2

          ROM 1               5 ASCII 16kB
          ROM 2               0 Generic 8kB

          DRIVE A
          DRIVE B

          continue

(^w^)  POWER

          state quick load
          state quick save
          state file load
          state file save

          EXIT

Xevious: Fardraut Saga will begin.  Once you try the game's flashy new Scramble mode, you're sure to agree that it was worth all the effort.

Games on disc aren't so difficult to run.  Move the red cursor to DRIVE A, then press the O button.  Highlight the disc game you want to play, and press the O button to set it in the virtual MSX's disc drive.  There's no messy format swapping required... just move the red cursor down to POWER and press the O button, and the game will automatically begin.

Some games span two discs... for these, set the first disc in DRIVE A, then set the second disc in DRIVE B, using the directions listed above.  A few MSX titles are even larger, stretching across three or more discs!  You will need to put the first two discs in DRIVE A and DRIVE B, then move the cursor down to POWER and press the O button.  When the game prompts you to swap discs, press the L button, then set the disc it requests in either DRIVE A or DRIVE B.

GOLDEN GRAIL: METAL GEAR 2

Now that you've got the basics down, it's time to sneak in a few games of Metal Gear 2: Solid Snake, the MSX exclusive sequel to Hideo Kojima's immensely successful stealth action title.  This one's tough to run, even by MSX2 standards, so pay attention!

First, you'll need a copy of the game.  Click the link below, then scroll down until you see the words ROM IMAGE in purple.  Click this link to download a copy of Metal Gear 2: Solid Snake, translated to English by the fine folks at G&T Soft!

ENGLISH METAL GEAR 2 DEVELOPMENT COMMITTEE

Now, press the L trigger on your PSP to exit out of Xevious: Fardraut Saga, and move the red cursor down to EXIT and press the O button.  Reconnect your PSP to your computer and set it into USB mode, as described on the bottom of this page.  Transfer the game, called MG2ROM12.ZIP, to the MSX folder on your PSP. 

Next, disconnect your PSP from your computer and run the fMSX emulator.  You're almost ready to run the game.  Move the red cursor to ROM 1 and change the mode to 2 Konami5 8kB.  Make sure that MSX TYPE is still set at MSX2.  Press the O button, then highlight MG2ROM12.ZIP on the list of games and press O again.

The game is loaded, but you're not finished yet!  Move the cursor down to ROM 2 and press the O button.  Highlight the yellow word BIOS... this is the folder where you put all the MSX BIOS files.  Press O, then highlight MSX2.ROM.  Press O once more and you'll return to the main menu.  Finally, move the red cursor down to POWER and press the O button again.  The Konami logo should appear, and the game will begin shortly thereafter.

ADVANCED USAGE

This is all you need to know to start using fMSX.  However, the emulator's more advanced features, like save states and button configurations, do come in handy when running longer, more complex games.  Metal Gear 2 is a perfect example... you'll need to frequently access the keyboard to switch between weapons and answer incoming calls on your radio, but where's the fun in that?  It's much more convenient to assign these keys to buttons on your PSP.  Here's how you do it.

First, press the L trigger to return to the main menu, if you're already playing the game.  Move the red cursor to CONFIG and press the O button.  Now, move down to KEY CONFIG and press the O button.  You'll see a screen similar to this one:

(^w^)  EXIT
          joy I                    O
          joy II                   X
          joy Irapid             A
          joy IIrapid            []
          MENU                
L
          KEYBOARD        
R
          QuickLoad
          QuickSave
          FileLoad
          FileSave
          VideoMode

          TURBO
          key SPACE
          key RETURN
          key ^
          key v
          key <
          key >
          key ESC

Normally, you'd have to press function keys on the keyboard to switch between weapons, select equipment, and pause the game.  All this could be accomplished with the square and triangle keys on the PSP, but they're currently assigned as useless rapid fire buttons.  No worries!  Just move the red cursor down to joy Irapid, then press X.  The triangle next to joy Irapid should disappear.  Move down to joy IIrapid, and press the X button again.  The triangle and square buttons are no longer assigned as rapid fire buttons.

Now you've got two free buttons.  Let's make the most of them, shall we?  Move the red cursor down to key F2, which is near the bottom of the list.  Press the O button, then the triangle button.  From this point on, pressing the triangle button while playing Metal Gear 2 brings up the weapons menu.  Pressing it again returns you to the game.

Buttons can be assigned multiple functions.  You can use this feature to address another issue in Metal Gear 2.  The hero can crawl under tight spaces, but in order to do this, you must press two buttons at once.  This is clumsy, and may result in your accidentally firing a weapon or eating a ration you can't afford to waste. 

The solution?  Use the square button to press both action buttons at once!  Move the red cursor to joy I.  Press the O button, then the square button.  Move down to joy II and repeat the process.  Now, the square button is assigned to both action buttons, preserving Snake's valuable resources and saving yourself a lot of unnecessary grief.

Metal Gear 2 is a very long game... the PSP's short battery life probably won't give you enough time to complete it.  That's fine, though... you can always use save states to record your progress, and resume the game later after your PSP's had time to recharge.  If you're in the KEY CONFIG menu, press the triangle button to exit it.  Move the red cursor to MAIN MENU and press the O button.

          CONFIG

          MSX TYPE      MSX2

          ROM 1               2 Konami5 8kB
          ROM 2               0 Generic 8kB

          DRIVE A
          DRIVE B

          continue

          POWER

          state quick load
(^w^)  state quick save
          state file load
          state file save

          EXIT

Move the cursor down to state file save, and press the O button.  After a brief wait, your progress in the game will be saved.  To resume your progress at a later time, move the red cursor down to state file load and press the O button.  You're returned to the exact point where you saved, a handy feature which can also be used to muscle your way through the toughest parts of your favorite games.

fin

In the first installment of this series, we offer general advice on how to get started with any of the emulators available for the Playstation portable.  You'll need a fresh PSP without updated firmware, a USB cable, and a connection to the Internet to begin.  Basic knowledge of Windows and the Internet is also important, although if you know how to access a web site like this one, you won't have any trouble following the directions on this page.

If you're not sure if your PSP's firmware has been updated, you can check by turning the system on without a disc in the drive.  Press left on the D-pad until the toolbox marked "Settings" is highlighted.  Press down until the "System Settings" icon (the PSP with a wrench next to it) is highlighted.  Press the X button, then press down until "System Information" is highlighted.  Press X once more, then read the number next to the words "System Software".  If it reads "1.50" or "1.00", your system can run emulators and other hobbyist-designed programs.  If not... well, you'll need to wait until someone cracks the latest revision of the PSP's firmware.


  ALL EMULATORS  

The common bond between every emulator available for the PSP is that they all must be installed on the system using an exploit tool.  There are several of these utilities available, but the one that's easiest to use is SeiPSPTool.  You may download this program from the link listed below...

SeiPSPTool

Click this link, then download the file either to your desktop or the folder of your choice.  Once the download is finished, locate a USB cable.  Plug the small end of a USB cable into your PSP, then the large end into a free USB port on your computer.  Eject any game disc that may happen to 
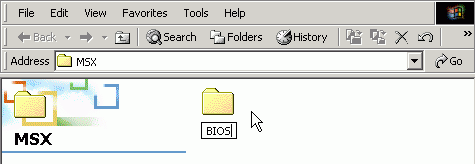
be in your PSP, then turn on the system.  You will enter the 
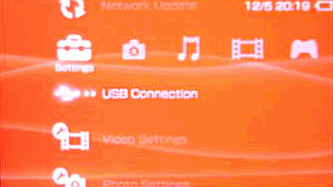
BIOS screen.  Press left on the directional pad until you reach the toolbox icon marked "Settings", then press up until "USB Connection" is highlighted.  Press the X button to put the PSP into USB mode, allowing it to receive files from your computer.

The USB Connection setting,
available on the PSP's BIOS screen.

The PSP will be recognized as an extra drive on your computer, and will be assigned its own drive letter.  Double click "My Computer" on your desktop and you will see the PSP listed as a removable drive.  Write down the assigned letter... you'll need this information when you start installing emulators on your system.

The red circle illustrates the location of the PSP on your computer.  The drive letter varies depending on the number of hard drives and disc drives connected to your computer.

Next, double-click the SeiPSPTool icon (you can't miss it... it looks just like a real PSP) to begin the program that will transfer the emulators to your PSP.

Sei PSP Tool, the program you will use to transfer files to your PSP.

You're almost ready to transfer files to your PSP, but first, you'll need to download some from a reliable source.  You'll find dozens of great emulators on the PSP Emulation News site.  Just click the link provided below:

PSP Emulation News

Once at the site, scroll down the page until you find the header "Emulators for PSP".  Beneath this header are a variety of emulators, supporting games for nearly a dozen game systems and computers.  Find an emulator you'd like to download, then click its link.  A page will appear describing the emulator in detail.  Scroll down the page until you find the word "Downloads", then click the word "Here" to start downloading the emulator you've chosen.  Once the emulator has been emulated, unzip it.  It is now ready to be transferred to your PSP.

Return to Sei PSP Tool by clicking on the program.  Click the top text window, next to the word "Name:", and type a name for the folder where the emulator will be stored.  Some emulators require a specific name for this folder, but many do not.  Once you've typed in a folder name, click the button marked with three dots, then locate the file EBOOT.PBP.  Finally, click the arrow next to the words "PSP Unit".  A drop down list will appear.  Select the correct drive letter for your PSP, then click it.  Finally, click the button labelled "Generate", then select your firmware model (if you bought an American PSP, it's probably 1.50). The emulator will be transferred to your PSP in a format it can recognize.

Step-by-step instructions on how to use the Sei PSP Tool.

An emulator just isn't an emulator without games to run, so you will need to download those as well.  Legal software can be obtained from Kojote's Public Domain ROMs site.  A link to this site is listed below:

Kojote's Public Domain ROMs

Download the games you wish to play, then access your PSP by clicking on My Computer, then the 
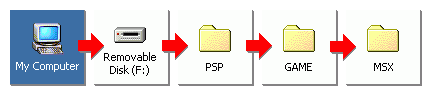
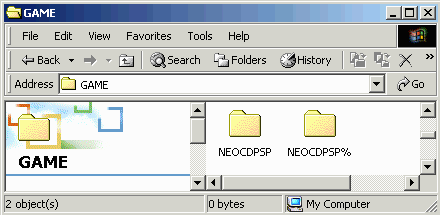
removable drive icon.  Double click the PSP folder, then the GAME folder.  Two folders will appear, one with a percentage sign on the end, and the other without one.  Drop the games into the folder WITHOUT the percentage sign.

Remember, transfer all games to the folder without a percentage sign!

Wait for about fifteen seconds, then disconnect your PSP from your computer.  In earlier versions of Windows, you'll want to click the "Unplug or Eject Hardware" icon on the bottom right hand corner of the screen first.  Click the "Stop" button in the window that appears, then "OK" before you unplug your system.

Press the O button on your PSP to take it out of USB mode.  Next, press right on the directional pad until you reach the icon labelled "Game"... it looks like a game controller, so it's easy to spot.  Press down until the words "Memory Stick" are highlighted.  Now, press X.  Your emulator should appear, along with an icon labelled "Corrupted Data".  Highlight the emulator, then press the X button to start it!

NOTE: The Gameroom Blitz offers links to emulators and game files for educational purposes only.  Emulation is legal.  However, many of the games supported by emulators are protected under copyright law.  The reader assumes all responsibility for illegally obtained software, and for any damage done to their computers or their game systems.